

In today’s fast-paced software development landscape, achieving speed, accuracy, and efficiency is crucial. Developers frequently juggle between tools, documentation, and complex debugging tasks. This is where Cursor AI emerges as a game-changing solution.
If you’ve ever imagined a world where you can interact with your codebase, ask questions, and receive context-aware answers instantly—Cursor AI makes that a reality.
Cursor AI is a cutting-edge code editor built on Visual Studio Code, enhanced with artificial intelligence capabilities. It goes far beyond basic autocomplete. Cursor deeply understands your entire codebase, allowing you to chat with your code, intelligently refactor, and debug across files using natural language.
It’s like having a highly experienced developer working beside you 24/7.
With simple comments like // generate a function to validate email, Cursor can generate clean, production-ready code instantly—no more endless searching for code snippets online.
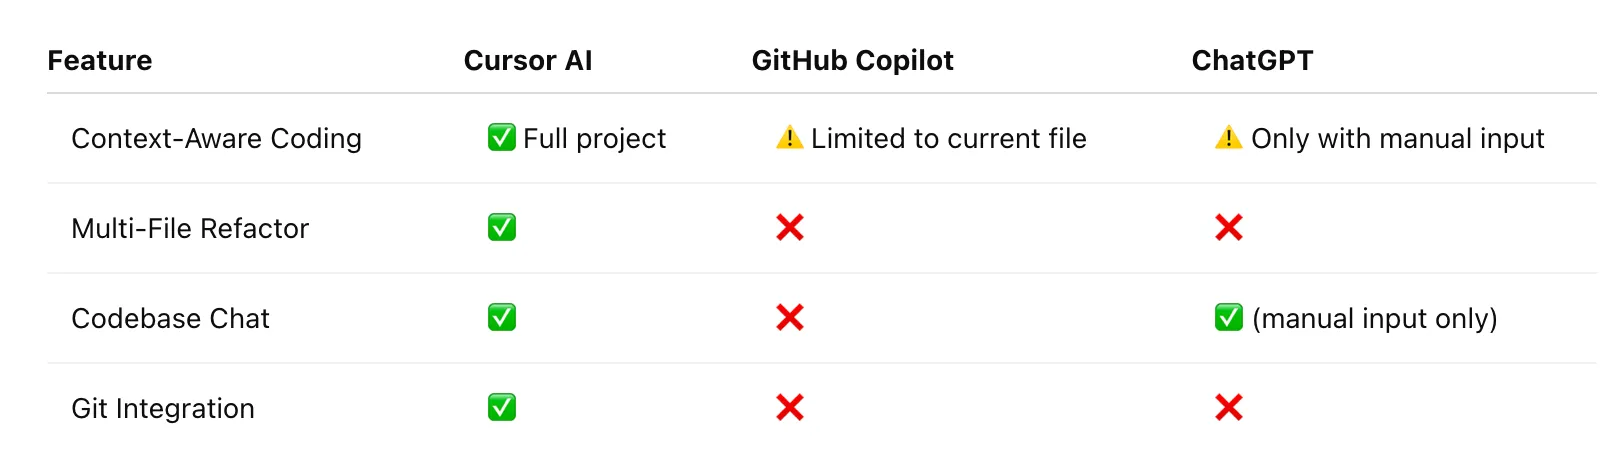
Cursor allows you to ask questions about your codebase in plain English. Whether it’s legacy code or complex logic, it delivers understandable, relevant answers instantly.
Unlike other tools that focus on single files, Cursor can refactor code across your entire project, updating all related references automatically.
Cursor identifies bugs and offers intelligent suggestions or auto-fixes, helping developers resolve issues faster and with greater accuracy.
Cursor integrates with Git to understand commit histories and generate context-aware commit messages, offering a seamless development workflow.
Cursor AI is perfect for:
Cursor AI represents a shift in how software is built—focusing on collaboration between humans and AI. It allows developers to concentrate on logic and innovation while automating repetitive and complex coding tasks.
Context:
You’re working on an e-commerce app and your function calculateTotal(cartItems) is returning incorrect values when there are multiple items.
How to Use Cursor AI:
Expected Outcome:
Cursor AI analyzes the function, identifies miscalculations (such as incorrect loop logic or misused array methods), and rewrites the code to accurately compute the total.
Context:
Your team is upgrading a legacy project. Many parts of the codebase still use verbose loops and outdated syntax.
How to Use Cursor AI:
for loop that builds a list.Expected Outcome:
Cursor will replace the loop with a more concise list comprehension, making the code cleaner and easier to maintain, without changing the logic.
Context:
You need to add a /register route to an Express.js backend to handle new user sign-ups.
How to Use Cursor AI:
Expected Outcome:
Cursor generates the complete route code:
POST methodContext:
You’re reviewing a function written by a senior engineer. It spans 30+ lines and includes multiple nested conditionals and helper functions.
How to Use Cursor AI:
Expected Outcome:
Cursor generates a detailed explanation:
Context:
You wrote a utility function sanitize_input(text) that needs to be tested before production deployment.
How to Use Cursor AI:
sanitize_input function.Expected Outcome:
Cursor creates a new test file or code block with:
assert statementsContext:
Your dashboard is taking too long to load, and the cause is traced to a raw SQL query pulling data from multiple joined tables.
How to Use Cursor AI:
.sql or .js file (depending on usage).Expected Outcome:
Cursor analyzes the query and:
It may also suggest using query builders like Knex.js or Sequelize if appropriate.
Context:
You’re building a user registration form in React with fields for name, email, and password.
How to Use Cursor AI:
Expected Outcome:
Cursor adds:
useStateContext:
You’ve completed a critical function that performs several steps, but it lacks proper documentation.
How to Use Cursor AI:
Expected Outcome:
Cursor writes:
This improves team collaboration and code readability.
Context:
You have a client-side JavaScript snippet that you now need to implement in your backend Python service.
How to Use Cursor AI:
Expected Outcome:
Cursor converts:
This saves time and ensures logical accuracy across languages.
Context:
You know your app sends email alerts, but you can’t remember where the logic is written in your codebase.
How to Use Cursor AI:
Expected Outcome:
Cursor scans the entire codebase, and returns:
sendEmail(), notifyUser(), or triggerAlertEmail()Objective: Build a simple full-stack To-Do List Web App using React (frontend) and Node.js + Express (backend) with MongoDB (database). You’ll see how Cursor AI assists at each step — from scaffolding and coding to debugging and documentation.
Before using Cursor AI effectively:
todo-appconcurrently and nodemon for devpgsql
CopyEdit
todo-app/├── client/ → React frontend├── server/ → Express backend└── package.json
“Create an Express server with routes to add, delete, update, and fetch tasks from MongoDB.”
server.js or index.js file:js
CopyEdit
const express = require('express');const mongoose = require('mongoose');const Task = require('./models/Task');const app = express();app.use(express.json());mongoose.connect('mongodb://localhost:27017/todos');app.get('/api/tasks', async (req, res) => { const tasks = await Task.find(); res.json(tasks);});app.post('/api/tasks', async (req, res) => { const newTask = new Task(req.body); await newTask.save(); res.json(newTask);});app.delete('/api/tasks/:id', async (req, res) => { await Task.findByIdAndDelete(req.params.id); res.json({ success: true });});app.put('/api/tasks/:id', async (req, res) => { const updated = await Task.findByIdAndUpdate(req.params.id, req.body, { new: true }); res.json(updated);});app.listen(5000, () => console.log('Server running on port 5000'));
models/Task.js Mongoose schema:js
CopyEdit
const mongoose = require('mongoose');const TaskSchema = new mongoose.Schema({ title: String, completed: Boolean,});module.exports = mongoose.model('Task', TaskSchema);
“Create a React UI to display tasks from /api/tasks and allow users to add, mark complete, edit, and delete tasks.”
App.js with stateful logic:jsx
CopyEdit
import React, { useState, useEffect } from 'react';import axios from 'axios';function App() { const [tasks, setTasks] = useState([]); const [title, setTitle] = useState(''); useEffect(() => { axios.get('/api/tasks').then(res => setTasks(res.data)); }, []); const addTask = async () => { const res = await axios.post('/api/tasks', { title, completed: false }); setTasks([...tasks, res.data]); setTitle(''); }; const deleteTask = async (id) => { await axios.delete(`/api/tasks/${id}`); setTasks(tasks.filter(t => t._id !== id)); }; return ( <div> <h1>To-Do List</h1> <input value={title} onChange={e => setTitle(e.target.value)} /> <button onClick={addTask}>Add</button> <ul> {tasks.map(task => ( <li key={task._id}> {task.title} <button onClick={() => deleteTask(task._id)}>Delete</button> </li> ))} </ul> </div> );}export default App;
axios to package.jsonproxy: http://localhost:5000)bash
CopyEdit
npm run dev
http://localhost:3000 to see the frontend, and http://localhost:5000/api/tasks to see API JSON response.“Why is my task not being saved to the database?”
Cursor may check:
It then suggests:
try/catchAsk:
“Add basic JWT authentication to this web app with login and registration.”
Cursor will:
authRoutes.jsbcryptjs and jsonwebtoken/register and /login endpointsAsk:
Cursor AI will:
You now have a working:
At Hexaview Technologies, we specialize in delivering end-to-end Cursor AI development services. Our offerings include:
We empower businesses to seamlessly adopt Cursor AI and transform their software development lifecycle.
Cursor AI is not just a development tool—it’s a catalyst for productivity and innovation. It redefines how developers interact with code, enabling faster delivery, better quality, and improved understanding.
If you’re ready to experience the benefits of AI-driven development, Hexaview Technologies is here to help.
Let’s innovate together.
Reach out to our experts today and discover how Cursor AI can elevate your next software project.


.svg)


.svg)