

So far, nothing has broken since you’ve been building managed package apps on the platform with joy. However, with the advent of Second-Generation Packaging, upgrading is no longer as straightforward. You’ve come to the right place.
You can use 2GP (Second Generation Packaging) to organize your source, build small modular packages, integrate with your version control system, and better utilize your custom Apex code. There are no packaging or patch orgs because version control is the only reliable source of information. All packaging tasks can be carried out via the Salesforce CLI or automatically with scripts. List second-generation managed packages on AppExchange after submitting them for security evaluation. Let’s dive into the 2GP-specific benefits and then why.

Or See Comparison of 2GP and 1GP Managed Packages for more details.
Salesforce will continue to invest in 2GP, which has distinct advantages over 1GP and is the technology for app development. However, as the most recent packaging technology, 2GP still needs to catch up to 1GP in terms of feature parity. Current gaps are:
We hope this gives you the confidence to study more and utilize 2GP.
Note: – The proper permissions must be set in the Dev Hub org for developers working with 2GP packages. Either the Create and Update Second-Generation Packages permission or the System Administrator profile is required for developers. Add Salesforce DX Users for further details.
So, now we are all set to get some hands-on 2GP.
To get started, you will need to create a new directory on your Dev machine.
Include the —-setdefaultdevhubusername option while carrying out this step. After that, when executing additional Salesforce CLI tasks, you can omit the Dev Hub username.

Check sure every component of the package is present in the project directory where you wish to create it. You must add at least one piece of metadata before moving on to the next phase if you are testing out the exact steps and commands in this workflow.

Run the command: From the Salesforce DX project directory,

For each package, the following command only has to be run once. Even though we claim that customers install packages the majority of the time, they really install versions.

You may already have a Dev edition org that you can use to install the package we’re experimenting with. If not, you’ll need to create one. Avoid doing this in Production… As a precaution. You’ve been forewarned.
Review your sfdx-project.json file. The CLI generates an alias using the package name and automatically modifies the project file to include the package directory.
Notice the placeholder values for versionName and versionNumber. You can update these values or indicate the base packages that this package depends on. Your generated namespace will be visible in your project file.
The package metadata is presumed to be in the force-app directory in this example.

There are two ways we can create a version for a package that is
(1) Without —codecoverage (See (2) in the above image) –
CLI does not check the codecoverage but the problem with this is that the package cannot be promoted from Beta to Released package. And demonstrate this kind of error –

(2) With –codecoverage (See (1) in the above image) –
CLI will test all the test classes for more than 75% code coverage if all went well then it starts making the package.
When this command is done, you’ll see something like this on the Terminal:

If you have included all the components and dependent components correctly then you can move to the next step but if there is an error, try to resolve the error by including the required component.
But before you go to the next step, In the 2GP package we don’t have the right to include some metadata types. E.g., we cannot include AuthProvider in our package. If we include, then this error is shown –

For more details – https://developer.salesforce.com/docs/metadata-coverage
To make your package available for the Production org, we need to promote it to the released state or other than the Beta version.
To make your package available for the Production org, we need to promote it to the released state or other than the Beta version.

After clicking Enter, you will receive the below message

After clicking y –

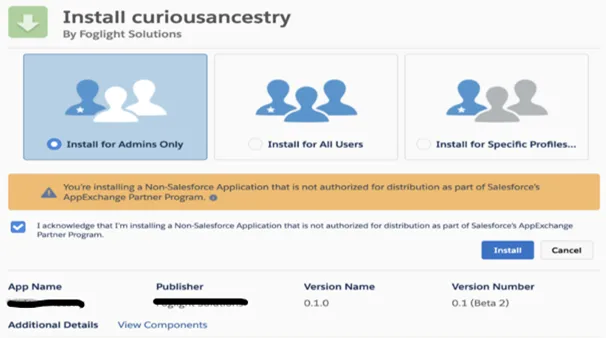
After this, you can install your package as you did in the above step with the URL.
So that all in the Package creation and installation. Now you can play around with packaging.
When working with second-generation packages, we advise that you adhere to these best practices.
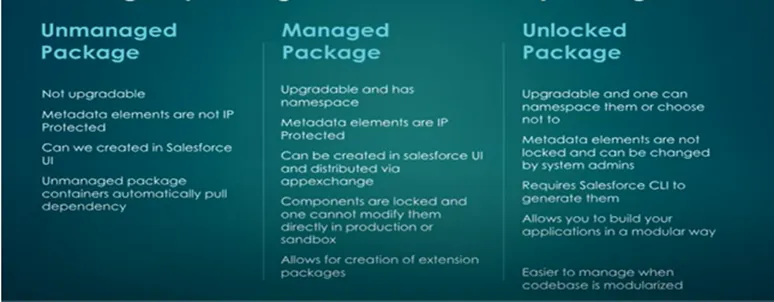
Salesforce offers multiple package types within 2GP to support different development and distribution needs. These include managed packages for AppExchange distribution, unlocked packages for internal use, and org-dependent unlocked packages for more flexible deployments. Each type serves a unique purpose, allowing developers to align packaging strategies with their business and technical requirements.
If you're exploring how to choose the right approach for your organization, don’t miss our detailed guide on legacy modernization strategies. It explains how modular architectures and scalable systems play a crucial role in modern development: Strategic Approach for Legacy System Modernization
Second-Generation Packaging is more than just an upgrade, it’s a shift toward modern, scalable, and developer-friendly application lifecycle management. By embracing 2GP, you empower your team to build modular apps, streamline deployments, and integrate seamlessly with version control systems.
If you're looking to implement 2GP effectively or modernize your existing Salesforce architecture, our experts at Hexaview Technology are here to help. From strategy to execution, we ensure your transition is smooth, secure, and future-ready.
Get in touch with us today to unlock the full potential of Salesforce 2GP and accelerate your digital transformation journey.


.svg)


.svg)