.svg)
SSO Integration: Implementing SAML, JWT, and Azure AD with Django

February 11, 2026

Mins Read

This blog is your go-to guide for implementing Single Sign-On (SSO) in Django applications using SAML and Microsoft Azure Active Directory. Learn the step-by-step process, from Azure AD app registration to user authentication and JWT token generation. Elevate user experience and security by seamlessly integrating your Django app with Azure AD for efficient and secure authentication.
What is Single Sign-On (SSO)?
Single Sign-On (SSO) is an authentication process that allows users to access multiple applications with a single set of login credentials. Instead of maintaining separate login credentials for each application, users authenticate once and gain access to all connected services seamlessly.
Why Use SSO?
- Simplifies user experience: Users don't need to remember multiple usernames and passwords.
- Enhances security: Centralized authentication and access control improve security measures.
Step 1: Azure AD App Registration
Create an Azure AD App: An Azure AD App represents your Django application in the Azure Active Directory. It serves as a bridge between your app and the Identity Provider (IdP). During registration, you obtain an "Application (client) ID" and "Directory (tenant) ID."
- Navigate to the Azure portal.
- Go to "Azure Active Directory" -> "App registrations" -> "New registration."
- Fill in the required details, and note down the "Application (client) ID" and "Directory (tenant) ID."
Configure Redirect URI: Specify the Redirect URI, where Azure AD will send the SAML response after successful authentication. This should be a route in your Django app,
- In the app registration settings, go to "Authentication."
- Add a redirect URI for your Django application, e.g., http://localhost:8000/sso/login/ (replace with your actual Django app URL).
- Also, add the redirect URL where your application will get a redirect after a successful authentication. e.g.,http://localhost:8000/sso-login/ (replace with your actual Django app URL).
Generate Client Secret: A client secret is a secure key that the Django app uses to authenticate with Azure AD. Generate a new client secret, and keep it secure.
- In the app registration settings, go to "Certificates & secrets."
- Generate a new client secret, and note down the value.
Add API Permissions:
- Go to "API permissions" and add the necessary permissions for your application, depending on the resources you want to access.
Grant Admin Consent:
- After adding permissions, click on "Grant admin consent for {your organization}" to ensure permissions are granted.
Step 2: Generate Certificate and Download Azure AD Metadata XML
Why Use a Certificate and Metadata XML?
A certificate is used to sign and encrypt SAML messages exchanged between the Service Provider (Django) and the Identity Provider (Azure AD). The metadata XML file contains crucial information about your app's SAML configuration, making it easier to set up the IdP.
Generating a Self-Signed Certificate: Use OpenSSL to generate a self-signed certificate consisting of a private key, public key, and a combined PKCS#12 certificate file.
Download Azure AD Metadata XML:
- In the Azure portal, go to your registered app's "Overview" page.
- Click on the "Endpoints" tab.
- Copy the value under the "Federation Metadata Document" endpoint (e.g., https://login.microsoftonline.com/YourDirectoryID/federationmetadata/2007-06/federationmetadata.xml).
- Open a web browser, paste the copied URL, and download the XML file.
Step 3: DjangoSAML2 Installation and Configuration
Install DjangoSAML2: djangoSAML2 is a Django package that simplifies the integration of SAML-based SSO. Install it using pip:

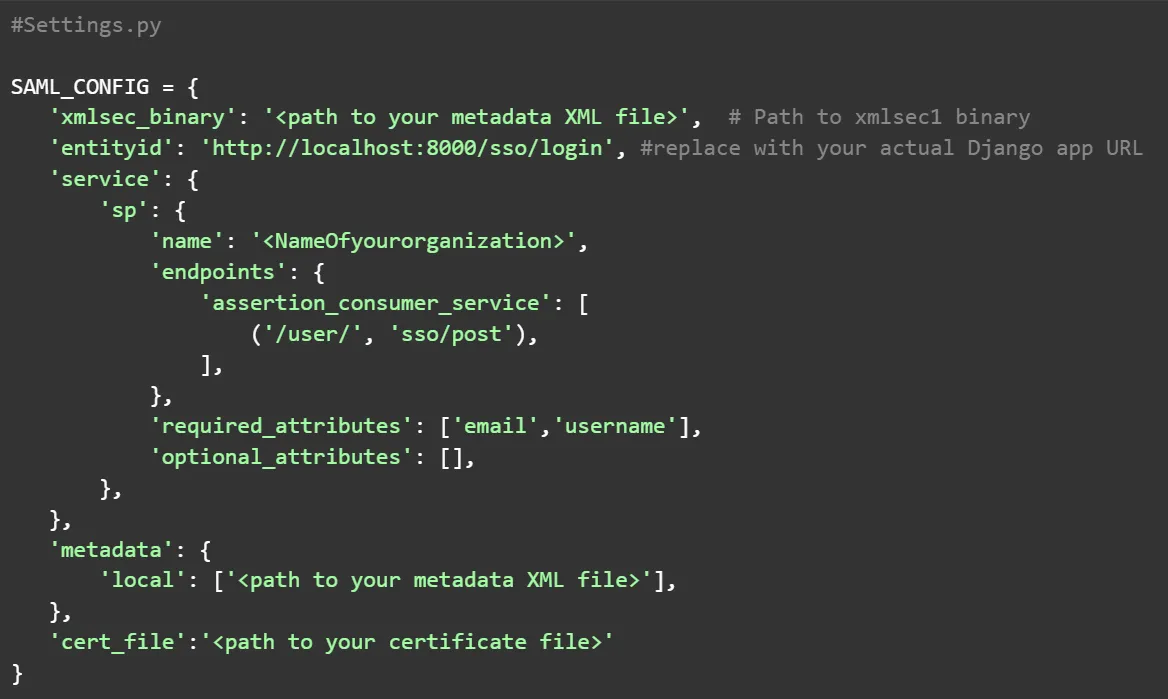
Configure DjangoSAML2: In your Django project settings, configure djangoSAML2 with the necessary parameters. This includes details about your app as well as Azure AD's SAML configuration.
Step 4: Extracting User Information
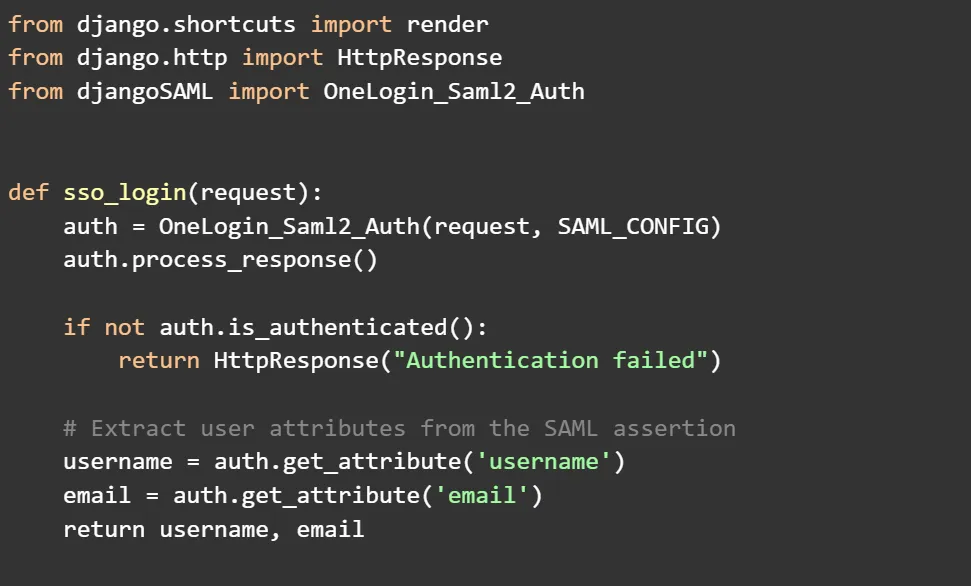
Implement SSO View: Create a Django view that will handle the SAML response from Azure AD. This view initializes the OneLogin_Saml2_Auth object, processes the response, and extracts user information from the SAML assertion.
Extracting User Attributes: Use the get_attribute method to extract relevant user attributes such as username and email from the SAML assertion.
Implement SSO View:
- Create a Django view for handling the SSO process. In this view, you will handle the SAML response and extract user information.
Step 5: Generate JWT Tokens
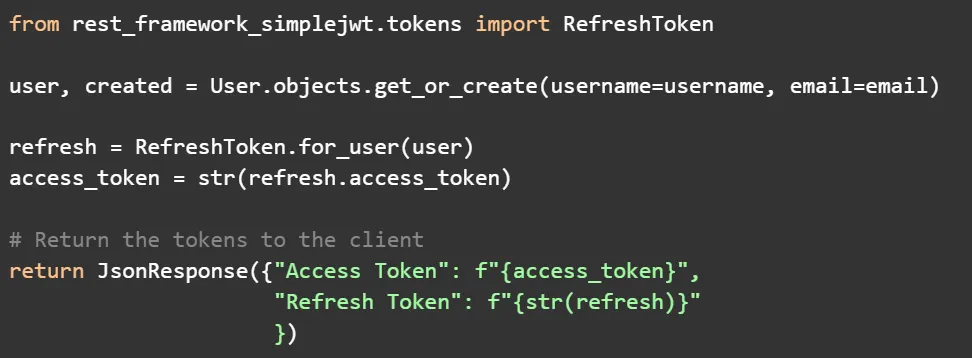
Generate JWT Tokens: Utilize Django REST Framework and Simple JWT to generate JWT tokens for the authenticated user. This involves creating a user in the Django user table (if not exist) and generating access and refresh tokens.
Why Use JWT Tokens? JWT (JSON Web Tokens) is a secure and efficient way to represent claims between two parties. They are used to authenticate users and grant them access to protected resources.
Generate JWT Tokens:
- Use Django REST Framework and Simple JWT to generate JWT tokens for the authenticated user.
Configuring Django URL Patterns
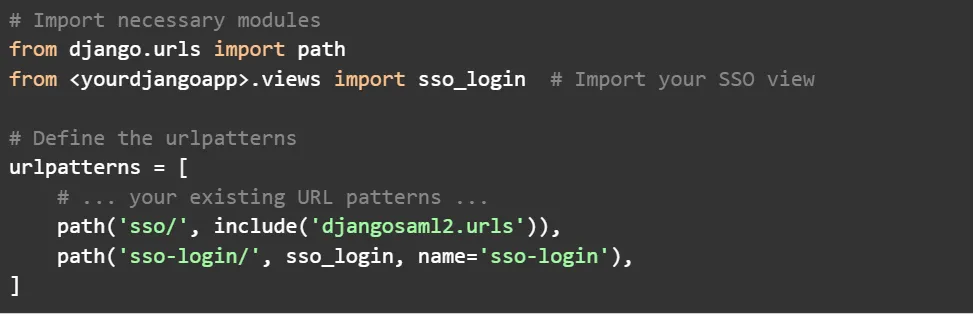
Open Your Django Project's urls.py file:
- Open the urls.py file in your Django project. This is where you define the URL patterns for your application.
Add the DJANGOSAML2 URL Pattern:
- Include a new URL pattern for the SSO endpoint.
Looks too complicated don't worry our experts at Hexaview Tech will help you with top notch Cloud Security Consulting Services.
Frequently Asked Questions
What is the "Thousand-Firm Mirror" effect?
Why is AI different from traditional SaaS software?
How are firms accidentally training their own replacements?
About the Author
%201.svg)
.png)
Table of contents
Ready to expand your global team?
Helping regulated enterprises modernize systems, adopt AI-first engineering, and deliver outcomes that pass audits the first time.